
Review on Full Motion TV Wall Mount, Swivel Articulating Arms for 26-55 Inch TVs, Perfect Center Design, VESA 400x400mm and 77 lbs Capacity - Mounting Dream MD2413-MX by Mark Strong

Reliable solution for fixing the TV to the wall.
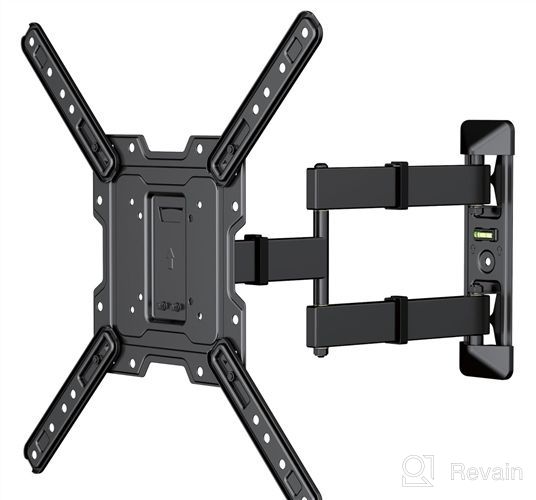
The children bought a new apartment, and I was asked to bring it to mind, that is, hang various household and household appliances on the walls. I won’t say that they were poor, they could have called a "husband for an hour”. But ... it’s somehow more reliable with my own hands, and they seem to grow with me from the right place and plenty of free time. However, you will judge the quality of the work done by me at the end of reading the review. However, let's start. In the old apartment, the LCD TV LG 42LA690V-ZB stood on their legs, but here they decided to hang it on the wall. Well, let's start choosing a bracket. To begin with, I rummaged through the Internet, and then decided to just go to one of the branches of the DNS company, located in a branch of the Bachurin shopping center. It is to go on foot, because the shopping center is located about four hundred meters from my house. And now I will make a discovery for most readers. Do you know that the DNS company is far from being located in the capital, but ours, Vladivostok? Now you know, and unbelievers can verify the veracity of my words on the Internet. The choice of brackets turned out to be quite large, I turned to a consultant for help and the final choice was (verbatim) " The main criterion in choosing a bracket is the so-called VESA (Video Electronics Standards Association). What it is? This is a standard that determines the relative position and diameter of the holes for attaching a special bracket to the TV case. The number of bolt holes is always four, and they are placed in the corners of a rectangle, the length of the sides of which is determined by VESA. Before going to the supermarket, I first measured the distances between the holes and in my case it turned out to be a square of 400 x 400 millimeters. So I bought a VESA 400 x 400 bracket. The bracket is universal, suitable for LCD TVs with diagonal sizes from 17 to 55 inches. The aforementioned LG 42LA690V-ZB measures 42 inches diagonally, which fits in with the requirements. The bracket is small, but holds a load of up to thirty kilograms, although it itself weighs no more than one and a half kilograms (the weight is not specified by the manufacturer). Our TV weighs much less, twelve kilograms, so the margin of safety is solid. Well, let's start unpacking, then installation and installation. The bracket was made in Hong Kong, China, which was predictable. Our TV is black, so I chose black for the bracket. In general, it will not be visible behind the TV case. The kit includes detailed installation instructions in Russian and English. The installation was not carried out according to the instructions, but in the way that was more convenient for me. First, I measured the distance between the mounting holes in the wall, and discussed the place for installing the TV with the children in advance. The concrete wall turned out to be load-bearing, so you can’t break through it with a simple drill. But I have all the necessary tools for the job. The wall was drilled with a Hitachi puncher, which served me faithfully for seven to eight years. Hole diameter eight millimeters, depth sixty millimeters. The hammer drill did a great job. I hammered plastic dowels into the drilled two vertical holes. If you make a little mistake with the absolute vertical position of these two holes, it doesn't matter. The problem is solved simply, I will tell later. We screw the M6 x 60 self-tapping screw into the upper hole. First, the self-tapping screw is screwed in easily with a screwdriver, about half the length, I even overdid it a little and knocked down the thread. But this does not matter, because then you have to tighten it with a key, but not all the way (this is important!), You need to leave a distance of three millimeters between the screw head and the wall. Then I started assembling the so-called adapter. The horizontal level can be inserted into the adapter immediately, or at the very end. At first, I could not figure out how to attach the four mounting strips to the bracket itself. I carefully examined the short black screws with square slots under the M6 x 12 head, then put one of the strips with a ledge that entered the recess on the adapter. And the screw fit perfectly into the square hole on the bar. I advise you not to tighten the nuts slightly, because after fastening all four strips, the holes at their ends will have to be combined with the holes on the back of the TV. So, having finished with these four strips, we begin to attach the adapter to the TV. And for this, the package includes four screws M6 x 14 and four screws M8 x 20. One four is suitable for your TV, the rest can be left in reserve. But these four screws are already thoroughly fastened with a Phillips screwdriver or a screwdriver to the TV case. At the end, we wrap those same four black screws. And then I remembered that the TV was without a power cable, took it out and ... it was not there: the TV power socket was under one of the slats. I had to give a black bolt with a nut and slightly unscrew the screw on the other end of the bar. I inserted the power cable, a black bolt with a nut and another bolt, which gave off slightly, tightened it again. We insert a level into the adapter (if not previously inserted) and now everything is ready for the final installation. Here one cannot cope, one more man's strength is required. And I made a mistake and tried to hang the TV on the wall myself. To do this, I combined the upper hole of the adapter and hung it on the same pre-screwed self-tapping screw. After that, he began to screw in the bottom screw, and at some almost finishing moment, the bottom screw began to scroll. I had to unscrew it, and together with it I took out a twisted plastic dowel from the hole. What happened: while I was turning the bottom screw, the TV began to put pressure on the head with its weight and direct the bottom screw up. Thank God, the hole in the concrete was not damaged. I had to wait for the arrival of my son-in-law and finish the installation with his arrival. To do this, you need to support or make some kind of device so that the TV does not press on the screws with its weight. Finally, we twist both screws, making sure by the level (which I installed in the adapter at the very beginning of installation) in the horizontal position of the TV. We close the fixing screws with two plastic overlays for a more aesthetic appearance. If required, you can loosen the adjustment knob on the adapter and adjust the vertical tilt of the TV up to fifteen degrees up or down. And by turning the adapter, you can change the horizontal position of the TV. You can also adjust the distance of the TV from the wall from 65 to 190 millimeters. So, the TV with the help of the bracket, as it is written on the packing box, turns, extends and tilts. That's it, the installation is complete. It took me an hour and a half to do everything, not counting the waiting for the arrival of my son-in-law. Let's hope that the bracket will last a long time, much longer than the declared warranty of one year. Well, are my hands growing from the right place?
- Great bracket at an affordable price.
- Not found.
New products
Comments (0)
Top products in 🎥 Projector & Speaker Mounts

Wall-Mounted Hanger For Echo Dot 2Nd Gen - Space-Saving Solution For Amazon Alexa Smart Home Speakers With No Messy Wires Or Screws, Perfect For Your Home (Black)
15 Review

Echo Spot Stand BMK Amazon Adjustable Support 360 Horizontal 40 Vertical Rotation Ball Bearings Bracket Speaker Mount Home Office
19 Review

Versatile Aluminum Wall Mount Stand For Echo Show 8 2Nd Gen & 1St Gen - Sleek & Adjustable Design Compatible With Echo Show 5 Black

17 Review

IKross 2-In-1 Cup Mount Holder: Perfectly Secure Tablet And Smartphone Holder For Your Car
14 Review


