
Review on SunFounder 10.1 Inch Raspberry Pi Touch Screen with 1280X800P Resolution by Jesse Costello

SunFounder 10.1 " HDMI touch screen
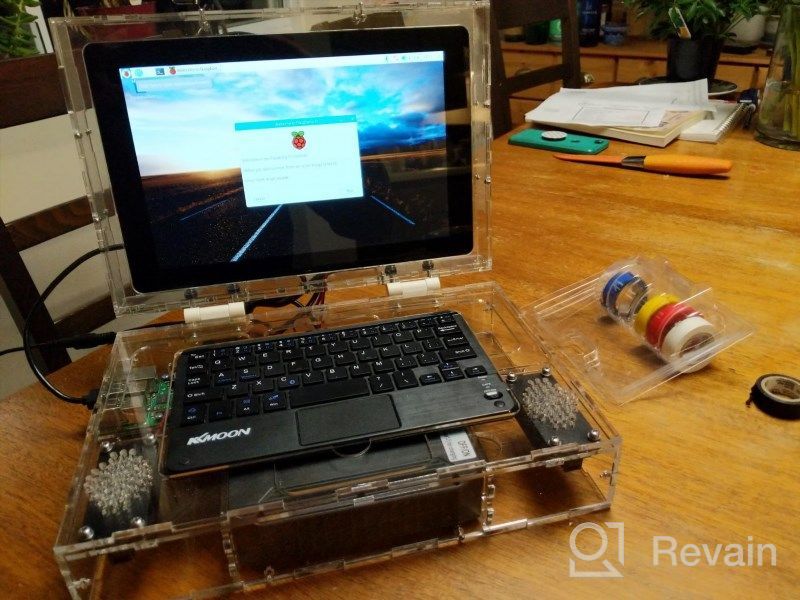
I bought this screen because I'm making a network packet sniffer with a Raspberry Pi (RPi) and want it to be as portable as possible. My first thought when I opened it up today was that it would definitely be better than the 3.5 inch device I have. Don't get me wrong, this little screen comes in handy for a few things (I'm going to use it to build a portable media player for the car), it just didn't fit my needs for this project like I was hoping. With a native resolution of 1280 x 800, this is a good high-resolution screen that renders Wireshark much better than a 3.5-inch device. It even shows 1920 x 1080 (Full HD), but the picture is a bit distorted and not that sharp. That's to be expected with any display that adjusts an image that doesn't match its native resolution. It also renders at resolutions smaller than native and stretches them to fit the entire display area. Depending on the resolution, the image can of course also be distorted. As an IT professional and electrical engineer, I found it interesting to put together, although some people might not like it. I love that it can be used with any device that has an HDMI output, and that the touch is sent over USB, which allows the touch feature to be used on any computer, not just the RPi line. It also requires no drivers, so it works with a wide range of operating systems and is very easy to install - all plug and play. The screen is powered by the included 12 volt DC power adapter. If you're using it with a single-board computer that's powered by a 5V USB power bank like the RPi, it'll also power it for you - no separate power bank is needed to power your RPi. It also has a power button that controls both the screen and the USB output, so this button turns everything on and off together. The only downside to this feature is that the connector can only supply 2 amps of current instead of the 2.5 amps (in terms of power, that's 10 watts instead of 12.5 watts) that the Raspberry Pi Foundation recommends for the 3V/3B+ model recommends. I haven't found this to be a problem, but if you want to create a hardware circuit design that will push the RPi to the limit, you'll need to use a separate power supply for the RPi itself. When my RPi 4 B arrives I will see how it affects its power supply (the recommended power supply for this is 5 volts and 3 amps or 15 watts). I assume it will probably be fine as long as I'm not trying to bus-power a USB 3.0 hard drive with an RPi 4 B. The only thing I'm not happy with and the main reason I only gave 4 stars out of 5 instead is the stand to hold the screen upright. Maybe I didn't read the description carefully, but it seemed to me that this comes with a kickstand: THIS IS NOT! The final section of the guide provides a link to a 3D printed stand file in case you need one. INDEED?!? How many people have 3D printers? I only know 1 and I'm in the IT industry! The university I teach at has a few, so I might find someone to print a poster for me, but I find that ridiculous. Luckily I'm pretty good with wood so I can make a wooden stand/frame for it. The sign should come with 7 short posts (pre-assembled), 7 medium posts and 2 long posts. When assembling the unit, mount the controller board to the 4 pre-installed short posts by inserting the 4 middle screws through the holes in the board and into the short ones. You then need to mount the single board computer of your choice on the other 3 short racks with the remaining 3 medium racks in the same way. These 3 short posts are adjustable with the 2 wrenches provided, allowing you to mount any of the single board computer systems available (any version of RPi, all other "fruity" boards, Libre Computer boards, etc.). 2 long stands are provided for the opposite end of the screen from the controller to stabilize it when placed on the table for use. My kit did not come with this configuration. Instead of 2 long posts he only had 1 long and 2 additional short unmounted ones. I assume this would REALLY annoy most people and is another reason I only gave 4 stars instead of 5. The manual (which is pretty well written) had 2 covers for some reason, so I removed the outer layer and stacked them until the combined layers were the same thickness as the circuit boards I installed. Then I carefully poke a hole in it to make a paper liner. I screwed one of the middle posts into one of the standard short posts (and cut the paper to a manageable size) via a paper spacer to make a long post and used the other short spare to attach my RPi to one of the other pre-installed short ones posts. This is quite a complicated solution, but it works well. Following the assembly instructions in the manual, there are instructions for installing the on-screen keyboard in Linux (which works by default on most single-board computers). It suits me - it means I have the latest version installed for my board.
- Has many uses. We look forward to experimenting
- Good screen, touch started failing after a week of use.
New products
Comments (0)


Top products in 🖥 Monitors

Sceptre C325B-144R: Advanced FreeSync HD Display with Wall Mounting and Tilt Adjustment

94 Review

LG 27MP59G-P 27 inch Monitor with FreeSync, 75Hz Refresh Rate, and 1080p HD Resolution
93 Review

Samsung Flat Monitor Super Slim Design 27", 1920X1080P, 75Hz, Flicker Free
112 Review

🖥️ Revolutionize Your Interface with Planar PXL2230MW 22 Inch 16 Touchscreen

97 Review
Another interesting products

50AA2500 EBL Individual Battery Charging System - Rechargeable Batteries
56 Review

💻 Get Amazing Video Quality with Logitech HD Pro Webcam C920 (Discontinued Edition)
83 Review

🎥 Logitech C270 Webcam: Crystal Clear Video and Superior Quality
183 Review

Apple AirPods Pro MagSafe RU Wireless Headphones, White
159 Review