
Review on Cocopar USB C Portable Monitor: Mountable 15.6" FreeSync Display with 1920X1080P Resolution, Blue Light Filter, 60Hz Refresh Rate, Built-In Speakers, Frameless Design - Y156FH7XD by Kevin Epstein

Upgrade your rig and increase your productivity
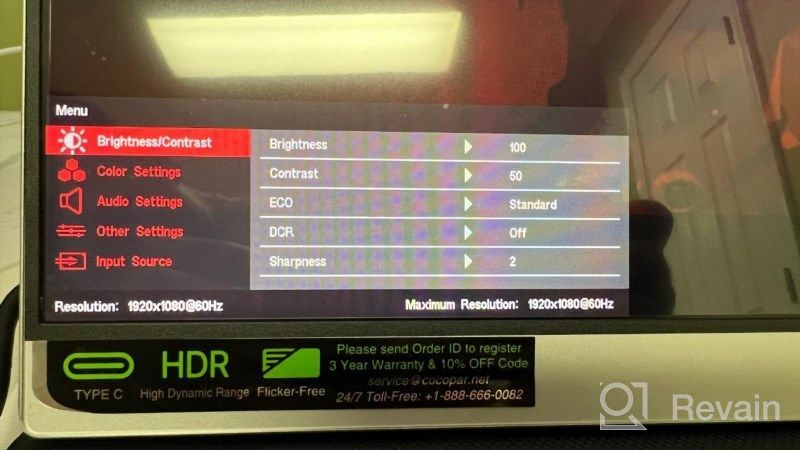
Pros: Doubling the screen area. Can power the monitor via USB-C without additional power adapter. *May require diet under certain circumstances. * Magnetic screen protector/stand. Tasks, learning topics, streaming or playing games, I probably spend more than 14 hours a day in front of a computer/tablet. With the growing need for multitasking, one of the biggest productivity improvements was a second monitor. The dual monitors allowed me to open more panels and reduced the need to switch back and forth between frames. So it was an easy decision to upgrade my home setup by adding a portable monitor to my home computer. Clear white retail packaging 16" thick. The lid featured a prominent silver metal "Portable Monitor" while the top/front panels presented the same information in bold black type. The left side panel was left undecorated while the right side panel contained the product SKU barcode. The lower panel shows the name of the portable monitor in the upper left corner of the panel and contact information at the bottom of the panel. I appreciated the clean white background, shimmering metallic font, and contrasting black and white theme. 4 inch tall (15 3/4 inch diagonal) screen protector then 2 lb 6.7 oz portable monitor out of the box. When the main product was removed from the box, I lifted the 3/4 inch foam pad and found an extra layer of foam with three notches. In the upper left corner of the panel I found a cutout 2 1/2 inches wide, 2 1/4 inches high containing black writing 1 7/8 inches high, 1 5/8 inches wide and 1 inch included. Wall adapter with USB-A output. Just below the cutout I found a second cutout that was 5 5/8 inches wide and 4 inches high. The medium cutout included a 39 3/4" black flat USB-A to USB-C power cable and a 47 1/2" matte black rounded USB-C to USB-C plastic cable. Cable C. The last notch was the largest of the three, measuring 5 7/8 inches wide and 6 1/2 inches high. The clip included the product's user manual, a 3-year warranty card, an updated accessory panel (monitor stand, portable battery, adapter adapter, streaming stick), two packs of screen protector installation kits (2 15/16" wide x 1 15/15" " broad). Customs). 16" tall cardboard clip/scraper, dust absorber, three guide stickers, and 3 7/8" square microfiber cloth) and a 48" micro HDMI to HDMI cable. Installation: 19-page instruction manual has proven to be very valuable The first two panels provided similar information as the included accessory panel and added a protective case for possible upgrades The third panel contains the table of contents (About your monitor, Using your monitor, Troubleshooting, Warranty and Support) The first section, "About your monitor " (pages 1-3), contained a listing of the contents of the box (as above), followed by a helpful paragraph on each of the items. The second page shows a panel with detailed product specifications (screen size 15.6", screen type IPS, resolution 1920×1080, aspect ratio 16:9, 100% sRGB, color depth 16.78 million, temperature 9300K, brightness 300 cd/m2, 1000:1, 178 degrees horizontal and vertical contrast ratio, 60 Hz refresh rate, weight 1.6 lbs, dimensions 14.8 x 8.8 x 0.2 inches, HDR support, Free Sync support, power consumption 6 W mini HDMI/3.5 mm audio jack/USB -C-Port x 2 ports, 1W x 2 built-in speakers). The third panel provides a left and right view of the monitor and associated ports (3.5mm audio jack/menu/power/output buttons on the right and mini-HDMI and two USB-C output ports on the left). Like the previous panels, the user guide describes the features in prose format. -20V), USB-A (wall adapter). The next three fields labeled "Monitor Connection" offer various image/text connection options. For laptops/PCs with Type-C ports, use the included USB-C to USB-C cable and power adapter. For laptops/PCs with HDMI ports, use an HDMI audio/video cable and use either USB-A to USB-C between computer/monitor or use a power outlet if needed. miniDP, you may need to purchase an adapter. You can connect the device to modern gaming systems via HDMI and a power outlet, or you can connect the current generation portable gaming system via a USB-C cable and a power outlet. You can connect the monitor to USB-C enabled phones, like in the laptop example above, or you can purchase a separate adapter/dongle for phones with proprietary charging ports. The instructions in the user manual were quite detailed regarding the on-screen display (OSD). The panel provided the menu layout and looked at brightness/contrast, color settings, audio settings, other settings and input source. You can use the Menu/+/- button on the right side of the monitor to bring up the OSD menu, use the +/- button to move up/down the list, and then press the button to select to activate your choice. You can customize each of the settings, choose from 4 picture modes (Standard/Game/Cinema (MY FAVORITE)/Photo), adjust the screen tint (9300k, 6500k, sRGB, User), hue, saturation, low blue light and color coverage (sRGB, Adobe RGB, DPI-P3, native color). The low blue light mode reduces the blue ambient light, which breaks down the natural melatonin, the sleep hormone. By reducing blue light, the monitor becomes less stimulating and can improve sleep. If you go to "Sound settings" you can turn the sound on/off or increase/decrease the volume. Under Other settings, you can set the aspect ratio to full screen or 16:9, turn freeSync on or off, customize language, set HDR to Auto/Off/2084, or reset to default. You can also use this panel to switch between Type-C or HDMI input sources. Recent panels have provided a detailed overview of the duplicate/extend/second screen options and several troubleshooting steps. Testing: To test the monitor, I connected it to my 15th laptop. I removed the magnetic cover from the monitor screen and laid the monitor face up. I used a screen cleaner/microfiber cloth to clean the surface and removed a thin layer from the top of the screen protector. Then I stuck a protective film on the screen surface. I found a few bubbles on the outer edges, pry up the edge of the screen with tweezers, and then removed as many bubbles as I could with a dust bag. Despite several attempts, I had about ten tiny blisters on the periphery that would not go away. I didn't consider this to be a fault with the product, but rather a problem with my installation technique. I plugged the power adapter into a standard outlet, the USB-A to USB-C cable from the adapter to the bottom USB-C port, and the USB-C to USB-C cable to the monitor and computer. I went to System Preferences on my laptop and then to Displays. I moved the computer display and the secondary monitor display from left to right, or held down the select key and dragged it onto the computer monitor display to flip the image. I didn't find this feature useful unless I wanted to specifically show someone what I was doing on the computer. When I moved the files/folders to the second screen, I immediately noticed that the screen seemed a bit dark. I hit the menu item, changed the brightness from 30% to 100% and immediately appreciated the improvement. I liked the ability to control/adjust settings, but would have preferred the preset function/memory and ability to dim the brightness. My laptop provided enough power over USB-C to power a second monitor without an additional power adapter. However, when I plugged headphones into the 3.5mm jack, performance was a bit lackluster. In this case, I had to connect the monitor to the included USB-A/adapter to add the power needed. I liked the intuitive keyboard shortcut, mini-HDMI output, additional USB-C, cable length, magnetic stand, and display quality. I didn't overlook the fact that the screen isn't a capacitive touch surface, but I had a similar issue with my computer. When switching between tablet and laptop, I forgot that the screen is not being touched. I've watched several movies on popular streaming services and enjoyed the quality of the videos. The sound was a little lackluster and I found the headphones to overcome this limitation fairly easily. I changed the mode to gaming, plugged my handheld game console into a USB port via USB-C, and enjoyed the large/portable screen. As with watching videos, I enjoyed the lag-free gaming session. However, I didn't like how the game mode changed the image to a more bluish hue. I switched back to video mode instead and found the images to be brighter and warmer. If I had some wishes for the screen, I would have liked a standalone volume toggle, not tied to a single button, and more powerful. Speaker. Although I've been asked about this, I think the company has created an amazing device and the OSD button/menu structure was well organized and easy to navigate. I was glad they included screen protectors and found that the small bubbles under the screen protector didn't affect browsing/streaming. Whether you're looking to add an extra screen to your desktop, laptop, standard home gaming system, or portable gaming session, this extra screen won't let you down.
- portable
- Unstable connections.
New products
Comments (0)
Top products in 🖥 Monitors

Dell SE2416HX Screen LED Lit Monitor 23.8", 1920X1080P, HDMI

93 Review

Samsung Flat Monitor Super Slim Design 27", 1920X1080P, 75Hz, Flicker Free

112 Review

HP 24Uh 24" Backlit Monitor 1920x1080p, 60Hz, LCD with HD Resolution - K5A38AA#ABA
101 Review

Dell SE2216HV LED 💻 Monitor with 60Hz Refresh Rate
101 Review
Another interesting products

💻 Get Amazing Video Quality with Logitech HD Pro Webcam C920 (Discontinued Edition)
83 Review

50AA2500 EBL Individual Battery Charging System - Rechargeable Batteries
56 Review

🎥 Logitech C270 Webcam: Crystal Clear Video and Superior Quality
183 Review

Logitech HD Webcam C270: Crisp 720p Widescreen Video Calling & Recording (960-000694), Lightweight and Portable at 3.15 lb.
192 Review