
Review on 🖨️ Comgrow Creality Ender Aluminum 220X220X250Mm: Reliable yet Affordable 3D Printer for Home and Business Use by Morgan Gilmore

Comgrow Creality very cheap 3d printer: my truth review
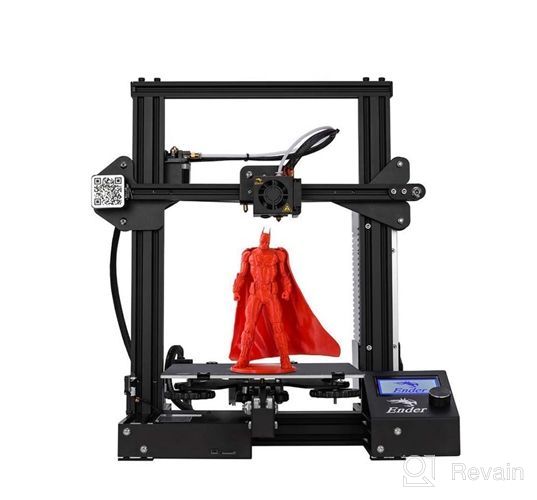
Let's look at the jambs of a 3D printer, how it prints and how to solve some of the problems that arise when printing with plastic. The printer is already morally and simply old. But it still works fine, at least for me. The parts turned out to be resistant, even the nozzles did not have to be changed. Plastic, of course, flies away at the moment, at home you constantly have to print something. The printer model is called Creality 3D Ender-3. And today it is one of the most interesting and discussed printers all over the world. And it's all about its price. Creality has done a great job of making the printer as cheap as possible while still trying to maintain its quality. Somewhere it succeeded, but somewhere it didn't. The print area is 220 x 220 and 250 millimeters high. The printer comes in a small box which is the smallest 3d printer box I have received. To begin with, the instruction suggests that we assemble the x-axis and install an extruder on it. There are no particular difficulties here, since the entire process is described in sufficient detail in the instructions. Next, you need to fasten the belt into the grooves. It must be installed exactly, otherwise it will cling to the profile. I recommend pulling it with some kind of lever. The main difficulty of the assembly is that it is not step by step. The fasteners are in separate packages and you need to select the appropriate screw for installation. After assembly, there will be a few spare fasteners. And I even have a whole package left unused. The whole process took me about 3 hours. Next, turn on the printer, it loads quickly and we immediately see the shell on the screen. I will not use standard film on the table from experience, I know from experience that they last about one or two months, therefore, separately from the printer, the original perforated glass on Creality was immediately ordered. It is made according to the type of ultra base. I won’t attach it to stationery clips either. Since the glass comes without an adhesive layer, it is necessary to use heat-conducting adhesive for radiators. We drip it in the four corners of the table and gently and firmly press the glass. Next, we warm up the printer and fill it with plastic. Next, you need to adjust the table height. And when setting the height, I ran into the first problem, you set the limit switch along the z axis yourself, according to the instructions, 32 millimeters from the beginning of the profile. But with the glass installed, this turned out to be very, very little. That is, it is low and even if the nuts are completely tightened, the nozzles will rest against the table. I even scratched the surface a little. In general, you need to significantly raise the limit switch up. If you use 3 mm glass, then the limit switch should be at a height of h 38 mm. Then it turns out that without glass with a regular film, it needs to be fixed at a height of about 35 millimeters. Keep this in mind when assembling. I noticed that the table is loose, but this is of course not acceptable, so you have to tighten the rollers. At the same time I saw that there was no insulation from below under the table. For insulation I will use glass wool and heat-resistant tape. Even on Ali, foil insulation on self-adhesive is sold. They will certainly be better, but I received them after assembling the printer. We warm and get beauty. In the center, the glass wool is additionally glued to a double-sided heat-resistant adhesive tape. Running the first test print, of course, it's like a regular calibration cube to look at the stacking of layers. This print takes about 15 minutes and allows you to quickly identify problems along the axes of the printer. Immediately at the launch, another drawback of this model was revealed. A strong and smelly unpleasant smell of burning appeared from the thermoblock. Layers of plastic laying are two tenths of a millimeter. Useful to look for what stinks in the printer. It turned out that this was burning glass wool, which insulates the thermoblock. I decided not to touch it for now, since in theory this frame is a stable thing and nothing should happen to it. As a result of printing, I got a completely normal cube, so we can say that the printer prints well right out of the box, but I didn’t like the firmware that was installed right away. It turned out to be a badly cut marlin, it lacks a lot of useful calibrations and settings. This firmware is only suitable for simple initial printing and does not allow you to carefully configure the printer. It turned out that the stock firmware freezes with the m-500 command, and the settings are not saved. That is, the permanent memory of the printer is disabled by the manufacturer in the firmware and it will not remember anything at all. In general, this does not suit me completely, so the next step is to replace the firmware with a normal full-fledged marlin. There is a miniusb port on the case for firmware, but there is no bootloader in the chip, so in order to upload the firmware, you will first need to connect to the microcontroller via the asp connector using a programmer. If you do not have a programmer, then I definitely recommend buying it, it costs about two dollars and is sometimes necessary for programming various microcontrollers. The bootloader is loaded using arduino and with just one click, after that, the firmware becomes available already through the USB port on the printer case. And the programmer is essentially no longer needed. First of all, I uploaded a new official firmware. A bug in the screen library made some characters unreadable. Pay no attention to it, that's not the point. The new version turned out to be exactly the same cut from a bunch of restrictions, so you have to look for and install custom firmware. We go to their site and download the complete assembly package, it is more than 400 megabytes in size. It is a prepared arduino environment for installation on a dozen different printers at once. We unpack and run the batch file, the shell is loaded, go to the configuration tab and there you need to remove the comment from the line ender 3. Then we compile and load it into the printer. The d-4d logo now appears when starting the printer. We see the normal shell of morality on it is not stabbed at all here, there are many settings available and it generally works fine for storing them. Today, the printer is in the spotlight because it is the cheapest of the new generation of normal printers. Its cost is about $ 200, even a little less. It prints well out of the box, but modifications are required to unlock its full potential. First of all, you need to buy perforated glass on the table according to the type of ultra base, it is best of course to take original, but you can also any other. The second thing in the printer is to replace the firmware with a custom one. It will open stabbed and settings. Further, it is desirable to modify the blowing system and install powerful snail fans. The disadvantages of the printer are as follows. Open design with power supply protruding from the side. Inconvenient control using the encoder knob. Weak regular blowing system and cut firmware. In general, we see that the printer is as cheap as possible by the manufacturer wherever possible. They made the price of the printer a virtue. There aren't many good printers available for $200 these days. But I assure you there are competitors. I must say right away that this printer is already obsolete. As a result, the printer has good print quality, and in combination with its low cost, this can be a decisive factor when choosing this model.
- Price, print quality
- Outdated, in need of improvement
New products
Comments (0)
Similar reviews
Top products in 🖨️ 3D Printers

🖨️ IFUN 3D Printing Liquid Resin: High-Quality Innovative Solution
5 Review

Economic Ender 3D Printer DIY Kit With Resume Printing Function, Large Printable Area Of 220X220X250MM By Creality 3D

18 Review

🖨️ FLASHFORGE Adventurer: Enhanced 3D Printer with Removable Extruders and Monitoring Features
4 Review

Flashforge Adventurer 3D Printer with Detachable Precision Leveling System

6 Review


