
Review on 🖥️ YGG Portable Monitor Y133Q01 - HD IPS 2560X1600 13.3" External Display by Kevin Riewer

Great portable monitor with lots of connectivity, works with Computer, USB-C, HDMI, Nintendo
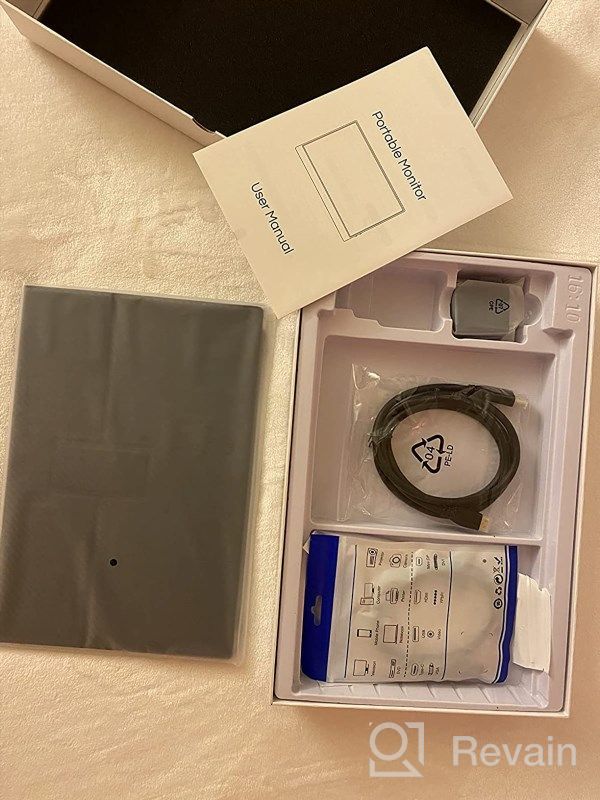
Whether you're looking for a compact monitor for occasional desktop use, when traveling, or just want a quick dual-monitor setup if you're working in a different room at home, this monitor should be at the top of your list. PACKAGING The monitor comes in a nice collapsible storage case (very similar to the cases you may have seen on iPads and other tablets). Including the case, it measures 14.25 x 9 x 0.5 inches and weighs 2.75 pounds. The case attaches to the back of the monitor with magnets and the monitor can be easily removed from the case completely. In fact, there are 4 mounting holes on the back of the monitor. So if you want, you can mount it on a monitor arm or similar device and get a compact display for your desk. The monitor has built-in stereo speakers on the left side. and right edges so you can use it completely standalone with your computer, gaming system, streaming device, etc. No additional speakers required. There's also a 3.5mm headphone jack on the right edge of the monitor, so you can use headphones if you prefer. There are two USB-C ports on the left edge of the monitor. One is a full-featured connector that accepts both power and video input. The other is for power only when your video source is not powering the monitor. If you power the monitor through a dedicated USB-C port, the monitor will also output power through a fully functional USB-C port. This means you can power/charge your computer or other device by connecting it to the monitor via USB-C. There's also a mini-HDMI port on the left edge, allowing you to connect to HDMI source devices such as streaming. boxes and game systems. On the right edge of the monitor is a USB-C port, which is used if you want to transfer keyboard and mouse control, as well as a spin wheel and button for navigating the onscreen menus. .The monitor comes with USB-C to USB-C cable, Mini HDMI to HDMI cable, USB-A to USB-C cable and USB-A power adapter. You will most likely get what you need the cables right out of the box. SETUP Setting up your monitor is a two-step process: installing and connecting the cables. it's under the back of the case. This forms a triangular structure on which the monitor can easily rest while resting on two rubber feet at the base of the monitor itself. It takes a few tries to get used to it and probably some other body positioning options are possible but this one I've found works the best. Of course, you can always just lay the monitor on a flat surface or use the mounting holes above if you need a more permanent installation. You have several options for connecting the cable, depending on what you want to connect to the monitor. Connect it to a USB-C 3.1 / PD compatible computer, then you will have the easiest connection. Simply connect the USB-C to USB-C cable from your computer to the full-range port on the left side of the monitor. That's all. The monitor is powered by your computer and also receives a video signal through the same cable. NOTE. Make sure you're using a USB-C 3.1 cable (one comes with the monitor). I first tried using an existing USB-C cable that I had and it turned out to only provide power but no video signal. Switching to the supplied cable fixed the problem. When connecting the monitor to an HDMI device, you need to connect both an HDMI signal cable and a USB-C cable for power. You can either use the included USB-C to USB-A cable along with the included USB-A power adapter to provide power, or you can use another form of USB-C connection that provides power. For example, you can connect a USB-C cable to a laptop for power delivery, or to a USB-C wall charger you might have for a cell phone, or even to a USB-C power bank. Nintendo Switch, you must use a full-range cable to connect to the USB-C port on the switch. Although the switch supplies power to the monitor, you will notice that there is no video signal. This is because the Switch only outputs video over USB-C when it detects that it's also getting power from the USB-C port (so it knows it's in a regular Switch dock, when connected to a TV). So for the Switch to work, you'll need to make sure you also have a separate USB-C cable connected to the monitor for power. This in turn powers the switcher and allows the video output to be viewed on the monitor. For a fully portable option, you can connect the power adapter to the monitor and then connect the switch to the monitor (see my photo of this setup). IN USE The monitor works much like any other monitor once you put it to work. . You can use the dial on the edge of the monitor to bring up the on-screen display and adjust various picture settings such as brightness and contrast, as well as switch between multiple inputs when you have devices connected via HDMI and USB-C. included. PERFORMANCE The monitor has a nice picture and looks great with 1920x1080 sources. I've found that it defaults to a slightly dim brightness setting for my liking, so I end up turning the brightness up to 100. It's still not as bright as my MacBook Pro's built-in display, but it's bright enough to use in sunny rooms to use and should be bright enough if you use it in a dimly lit area. The picture settings seem to reset when the monitor is unplugged, so you may have to go back and adjust the brightness every time you plug in the monitor. Not that big of a problem, but one should be aware of it. SUMMARY Overall a very good monitor if you are looking for something portable. USB-C connectivity and power delivery options really add to the versatility of this monitor and make it easy to connect to compatible devices.
- The adjustable stand gives you the perfect viewing angle
- Bad viewing angles
New products
Comments (0)
Similar reviews
Top products in 🖥 Monitors

LG 27MP59G-P 27 inch Monitor with FreeSync, 75Hz Refresh Rate, and 1080p HD Resolution

93 Review

Dell SE2216HV LED 💻 Monitor with 60Hz Refresh Rate
101 Review

Samsung Flat Monitor Super Slim Design 27", 1920X1080P, 75Hz, Flicker Free

112 Review

🖥️ Revolutionize Your Interface with Planar PXL2230MW 22 Inch 16 Touchscreen

97 Review
Another interesting products

🎥 Logitech C270 Webcam: Crystal Clear Video and Superior Quality
183 Review

Renewed Logitech G PRO X Wireless Lightspeed Gaming Headset with Blue VO!CE Mic Filter for Immersive Gaming Experience
122 Review

Smartphone Samsung Galaxy A50 4/64 GB, 2 SIM, black
82 Review

50AA2500 EBL Individual Battery Charging System - Rechargeable Batteries
56 Review