
Review on Low Ceiling Wall Mount Double Track Bypass Barn Door Hardware Kit For Closet Double Wooden Doors - ZEKOO 4-16FT (6.6FT Bypass Kit) by Bernard Foley

Notes from two successful Zekoo New Style Bypass hardware installations
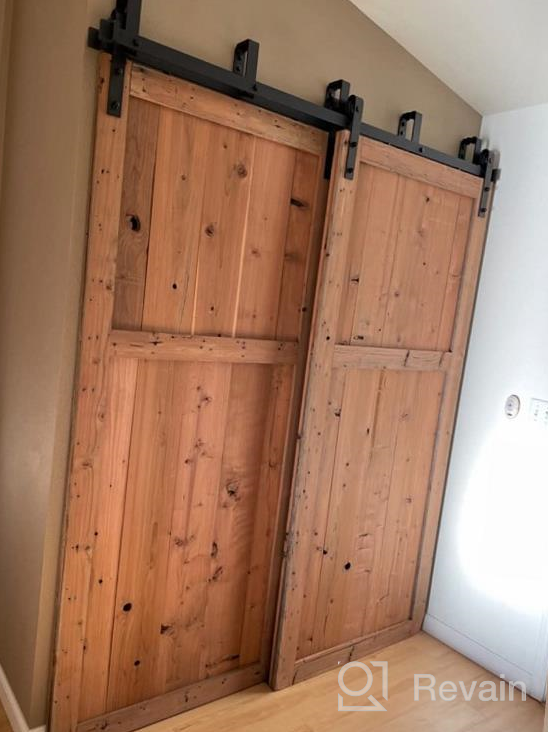
I love the end result from the two Zekoo 6.6 ft Bypass door hardware kits that we've now installed in front of 2 closets, in a home with low ceilings. My husband and brother-in-law helped me with the time- and muscle-consuming installation of this sturdy, heavy-duty Zekoo hardware. It took us three full days, not including door staining or trips to the hardware store. None of us had previously installed any sliding doors. I've read other reviews complaining about the instructions, and here are some things that we learned that might make helpful updates to the Zekoo instruction manual:1) The first step in the instructions should talk you through plans for the wall that will support this hardware. This Zekoo hardware is probably strongest when used on walls with a wall stud at the center of what will become the space above the doors, and additional studs on either side of the center at standard 16" intervals. My house is not so well built, with studs only at the ends of the closets. To compensate and insure our wall would support this heavy hardware, we added a 2" x 8" board to the inside surface behind the drywall above the closet. This board was supported by the top of the closet frame, and made the rest of the hole-drilling instructions work out easily. The Zekoo kit does come with drywall molly anchors. Considering the weight of the kit and my solid doors, my team decided not to trust mollies to hold it all up. We also used a 1" x 6" X 80" board, which I finished to match my doors, across the front of the top of the closet. Using this board gives more clearance for wall baseboards, and it also enabled us to make installation measurements and pilot holes on the board, before the board was installed on the wall.2) Where the instructions tell you to draw lines, I would have said "Mark points." Once the hardware is installed, you will be able to see part of any lines you have drawn on your wall, and you may need to paint or stain over your lines. Unnecessary extra work, easily avoided.3) The purpose of the bottom line is explained in the instructions, but the reasons for the top two lines are not. We learned that the other two lines are guides for the two screw holes in each of the brackets that will support the outside rail. These top two lines are also better replaced by marks versus lines, using a square to line them up at the proper vertical distance from the first, or bottom line of holes (see photo). The two rails ideally will run parallel to each other (otherwise, you will need doors of different lengths). Keeping everything square and using the measurements written in the instructions allows the inside and outside rails to line up properly.4) The instructions suggest screwing together the two pieces that make up the bracket, before mounting the bracket on the wall. If you have very little clearance over the open space your doors will cover, you may have to put the brackets together first to be able to tighten the screws. I only had 8 1/2" between the top of my closets and the ceiling, though, and we found it to be much easier to mount the part of the bracket that goes against the wall first, by itself, because it is harder to screw in the wall mount screws than it is to tighten the bracket connection screws. You can then level these bracket pieces and tighten them down. Separately, in a comfortable work space, you can loosely pre-assemble the other halves of the brackets onto what will be the outside rail, lift this whole construction into place, and screw and tighten all connections. The outside half of the bracket needs to fit over the top of the wall half of the bracket, for the rails to be aligned.5) For cutting the slot needed in the bottom of the door, the easiest approach we found was to ignore the instructions to cut out a notch 5/16" wide by 3/4" deep, and to use a circular saw set to approximately half the width of the door. My doors are 1 3/8" thick and our saw was set to cut 11/16" to cut at a depth of about 1/2". After making one cut in the door bottom, flip the same door over and, without changing the saw settings, saw again (see video). This process neatly created a straight track, which was wide enough to work with the small plastic door guides that came with my Zekoo kits. Zekoo measurements aim to have your doors 3/8" off the ground, so the guide does not have to fit completely into the track on the door. My doors slide very smoothly. We also found that the track was needed. The doors slide smoothly, but they also swing easily, without a guide.6) You will probably need to use many washers to make sure that no parts rub together and to make the kit fit your application. We made a number of final adjustments, including using two washers on each bolt through the outside track, to keep the outside track bolt ends from rubbing the inside door bracket when it slides. Also this kit works with a range of door thicknesses. My 1 3/8" doors were on the thinner end, and the door wheel hardware includes bolts with acorn nuts, which can only be tightened so far. I needed 6 washers per bolt to make this hardware work with my doors, or 48 washers per two door closet. I bought a box of washers.7) Finally, there are no extra nuts or bolts with this kit and there is a pile of hardware to manage. We lost much time at one point. trying to find an acorn nut that vanished. Be careful with the hardware!Other than some instruction clarification and maybe some extra washers and nuts, I think this kit is about as good as it can be, without coming completely pre-assembled. Nice job, Zekoo!
- Slides easily. Probably could have gone with less bulky looking style
- The kit is expensive compared to other barn door hardware options
New products
Comments (0)
Top products in 🔒 Door Hardware & Locks

🔒 High-Quality Patio Sliding Glass Door Handle Set with 45° Mortise Lock - Fits Various Door Thickness, Screw Hole Spacing, & Reversible Design - Non-Handed, Black

33 Review

Industrial Bigwheel Hangers Sliding Barn Door Kit - 6.6Ft Heavy Duty, 4-18FT Black Hardware, Smooth & Quiet Operation, Easy To Install (Fits 36"-40")
40 Review

ZEKOO 2.5-8FT Customized Style Interior Super Mini Sliding Barn Door Hardware Black Roller Rails Closet Cupboard Storage Cabinet Kit (2.5FT, Single Door Kit)
34 Review

Premium Replacement Keyed Patio Sliding Door Handle With Mortise Lock And Key Cylinder, Fits Doors 1.5 To 1.75 Inches Thick, Reversible Non-Handed Design, 3.94-Inch Screw Hole Spacing

40 Review
Another interesting products

Pack Of 1 Natural Wood Color 8 Ounce Bottle Gorilla Wood Glue
42 Review

32Oz Gorilla White Waterproof Patch & Seal Liquid For Effective Sealing (Single Pack)

30 Review

💪 Bondic UV Liquid Plastic Welder - Fast Cure, Strong Adhesive Repair Kit for Home, Garage, Outdoors, etc. - Complete Starter Set (LED Light & Liquid Cartridge in Compact Tin Case)

9 Review

Hemway Glitter Grout Tile Additive: Sand Gold Sparkle For Your Bathroom, Kitchen And Wet Room Tiles - Easy To Use And Temperature Resistant!
10 Review