
Review on Razorri Comodo Ceramic Fermentation Crock - 2L Traditional Water-Sealed Jar With Glazed Weights - Perfect For Kombucha, Sauerkraut, Kimchi, Pickles (Tangerine Tango) by Allen Tchida

Really nice fermenter, well made, good looking, but small.
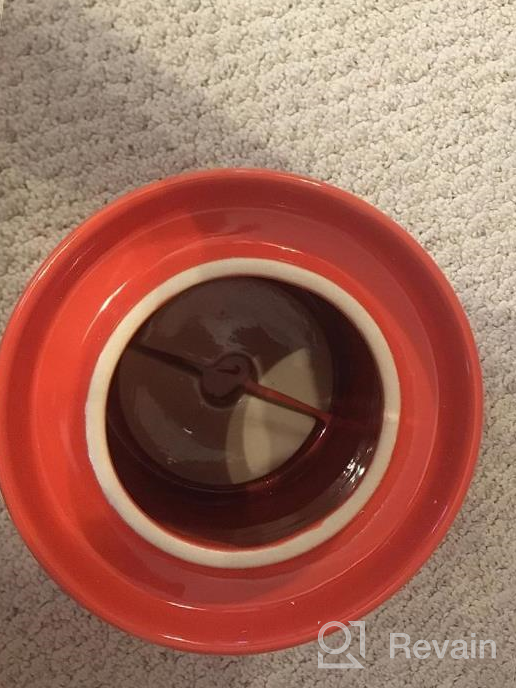
I’m giving this fermenter 5 stars, but most of the review, and photos, will be about its small size. This is not a negative; I feel that you should be aware of what a fermenter this size is and isn’t capable of producing.While 2.0 liters sounds as if it may be a bunch (about 68 oz.), remember that a typical jar of sauerkraut, for example, is between 32 and 42 oz.That being said, you go to the store, open up the jar, and finish off the 32 or 42 ounces of product.Good sauerkraut takes a minimum of a few weeks to ferment, and it can take as long as 6 or 7 weeks for a good product, although many people only ferment for 5-7 days. I have fermented kimchi for as long as 8 weeks. The flavor gets better (in my opinion) as it ferments, but the food gets softer. If you like very crisp sauerkraut, for example, you may only want to ferment for a week.While store-bought sauerkraut will rarely taste as good as homemade, waiting a month and a half for a bit more than a jar’s worth of product might not seem worthwhile to you.Pickles and Kimchi can take an even longer time, and although I did not actually measure this, I doubt that you could get more than 5 or 6 pickles in this fermenter unless you sliced them.If you look at recipes on the web, cookbooks, or in books on fermentation (and again, I’ll use sauerkraut as an example, but kimchi is about the same), the recipes start with 5 or 10 pounds of cabbage. That does not count the brine.You don’t fill these fermenters to the top; remember that there will be headspace on top (air space) and that the ceramic weights that hold the ingredients down take up some room as well.When I placed the weights in the fermenter and then added water to the level I would if I were fermenting, it took 48 oz. Remember, that’s water; your sauerkraut or kimchi or pickles or whatever else you are fermenting are going to take up more room and not come to 48 oz. (about 1.5 L)I typically use the formula of 2 lbs of cabbage (or other product if sliced, whole products such as cucumbers or olives will be less) per liter. This fermenter can hold about 4 lbs of cabbage (one large cabbage) if the cabbage is thinly sliced. If you prefer a more coarse-cut, it will hold less, maybe 1.75 lbs per liter. You will likely end up with about 1.5 - 1.75 Qts of sauerkraut after fermentation with this fermenter.So, why use this, and why 5 stars?It’s a good fermenter, well made, nicely designed, heavy with a proper water moat and breathing holes. It’s pretty; the tangerine is a nice color and stands out. The ceramic weights are nicely glazed. There’s nothing at all wrong with this fermenter, including the size.I do a lot of experimenting and making horseradish pickles, or kimchi from daikon radishes, or some fermented peppers with lemongrass, and when I experiment, I don’t want to use 10 lbs. of product at a time if I’m not sure how it’ll come out. I also like to have a few things fermenting at once and don’t want to take up a 5-liter fermenter for a small amount of product (it also doesn’t work very well).If you are just starting, and experimenting, this may be a good size for you, but I wouldn’t want you to be disappointed that you waited 6 weeks to get something that you’ll eat in a day or two and decide that it’s too much waiting (not work, there’s no work to this except to make sure that the water moat is full every few days) for such a small amount of finished product. Making fermented foods is both fun and healthy, and I would encourage you to try making them at home. Water moat fermenters are more expensive than other methods but are, in my opinion, the best and safest way to ferment, and so you may likely only buy one, maybe two, to start with.Think about how much product you want to have after waiting a few weeks. Remember, fermented foods can last a long time in the refrigerator and, with this small fermenter, you can actually just leave the whole fermenter in the refrigerator after you’ve completed the fermentation; larger fermenters may not fit.So, the question is not if you should get this fermenter; you should. The question is, what size will fit your needs best?BTW, one thing that was a bit disappointing was that this did not come with any instructions. As mentioned, fermenting is easy, but it is food, and just as undercooking or using dirty utensils, or keeping products unrefrigerated can cause health issues, so can fermenting incorrectly. However, there are dozens and dozens of instructional videos available on the web, so check them before you start.Recommended for small-batch fermentation.Additional info:Many people I have spoken with think that fermentation is difficult and requires some expertise.Start off simple by making sauerkraut. The procedure is very similar to most other fermented foods, such as kimchi, you just add different vegetables and spices, and pickles which are even easier.Here’s all there is to making sauerkraut; it’s this simple. The only one thing I would very strongly suggest is that you have (or buy) a scale that weighs down to 0.1 gram and up to 2000g. Most all electronic scales today will weigh in ounces, pounds, grams, kilograms, etc. and with just a touch of a button, the display will change from one to the other. The key is that you need, to do this safely, to use about 2% salt based on the weight of the vegetables, and it’s easier to describe that in grams. You want the scale to weigh 0.1 gram because it may not be accurate enough if it only weighs down to 1 gram. And, you want it to weigh up to at least 1,000g (2,000 is better) because you’ll be weighing a lot of vegetables such as cabbage for sauerkraut.Here’s a scale that will weigh down to (as little as) 0.1g (1/10th of a gram) and as high as 3,000g (3 Kilograms or about 6 ½ lbs). https://www.amazon.com/dp/B07G9DNNGF/ It’s less than $15 and will make life much simpler and easier for you. I’ve never used this model and I am just suggesting one such as this.If you don’t have a scale, as a general rule but not to be considered accurate, a teaspoon of table salt weighs 6 grams and a tablespoon of table salt weighs 18 grams (about 0.21 oz and 0.63 oz respectively)1) Wash, pull off the outer leaves, & take two leaves off of the cabbage and set them aside. Slice your cabbage. How thick or thin you slice, or dice it is up to your personal taste. .2) Weigh the cabbage and add 2% salt to it. Use sea salt or any fine grain salt that does not have any other ingredients in it such as iodine (iodized salt). Salt that is not pure can have an aftertaste. Grams work easy here; if you cut 1500g (about 3lbs, 5 oz) of cabbage, you would use 30 g of salt (1500 x 0.02). You can see why it’s easier to calculate 2% of 1500 than 2% of 3 lbs 5 oz. Remember, the amount of salt is a safety factor and you want to be accurate.3) Get a large bowl and add the salt to the cabbage and mix it together. My preference is to let it sit for an hour or so, but some people start to mix and crush the cabbage immediately. I wait, and then just pound on the cabbage as if you are punching it until the cabbage starts to feel a bit soft and the natural juices present in the cabbage are released and start to combine with the salt and create the brine.4) Transfer the cabbage, and whatever liquid has started to accumulate, to the fermenter and again press down on the cabbage to continue to break it up and release more of the natural water from the cabbage. Soon you will have brine covering the cabbage. Keep doing this (they sell wooden masher sticks to help, they’re helpful but not necessary). The liquid should cover the top of the cabbage at this point. If not, you can add some of your own brine which you will make by adding 2% salt to some water. To make a cup or so of brine, just add 5g of salt to 250g of water. You can use that to top the cabbage (it just needs to cover all the cabbage) if necessary, but it usually is not.5) Take the two leaves that you have put aside, and use them to cover the cabbage. The only reason that you are doing this is to stop the smaller pieces of cabbage from floating to the top.6) Cover the cabbage with the weights included with the fermenter.7) Add water to the water well made by the fermenter and lid, making sure to add enough water to cover the air holes if your fermenter is of that design.8) Check to make sure that there is water in the water channel and don’t let it get below the airholes. You can read online why this is important, but don’t let that happen.9) Some people ferment for 5-7 days, some for 5-7 weeks. Again, that is up to you. The product will gain flavor, but lose crispness as time goes on. You’ll find the spot that’s right for you.10) When you want to stop the fermentation, just place it in the refrigerator. You can refrigerate in the fermenter itself, or in containers of your choice. The fermentation will stop when refrigerated.This may sound complicated, but in the end, it’s really only: Chop cabbage, add 2% salt, pound the cabbage to release its water and to create the brine, place in the fermenter, cover with weight and lid, make sure to keep water in the water channel, wait, and place in refrigerator when done. That’s it! Make sure that your fermenter, weights, and anything you use are very clean. Try and keep the fermenter at home ambient temperature, don’t place it outside or near a window where it may get hot or cold.Fermentation is fun, and I hope you have lots of success and good eats.Review of: Razorri Comodo Ceramic Fermentation Crock, 2.0 L
- 12.9 x 8.6 x 8.4 inches
- The tangerine color may fade over time
New products
Comments (0)
Top products in 🍶 Home Brewing & Wine Making Supplies

WINKINE Acrylic Riser Display Shelf: Versatile 4-tier Organizer for Perfumes, Amiibo and Funko POP Figures
28 Review

Nitro-Style Draft Beer Dispenser - FIZZICS DraftPour, Perfect Gift For Homebrewers & Craft Beer Enthusiasts!

37 Review

24-Inch Musical Christmas Tree With Charlie Brown & Linus Blanket - ProductWorks
37 Review

YEAHBEER 3.2FT Felt Christmas Tree For Kids Wall With 30 Detachable DIY Ornaments - Xmas Gift And Door Hanging Decoration For New Year Celebrations

38 Review
Another interesting products

AmazonBasics Silicone Baking Mat Sheet

48 Review

100-Pack Of Disposable 18-Inch Piping Bags For Cake, Cupcake, And Cookie Decorating - Perfect For Icing And Frosting!

41 Review

GOBAM Wood Rolling Pin: The Perfect Dough Roller For Baking Cookies, Pie, Pizza & More - 13 X 1.38 Inches
35 Review

2-Pack European Grade Silicone Bunte Cake Pan Set - Non Stick Bakeware Fluted Tube Mold For Jello, Gelatin & Cakes | 9 Inch Baking Pans | Aokinle | BPA Free
38 Review