
Review on Upgrade Your DIY Printing Game With HICTOP'S Auto Leveling Prusa I3 3D Printer Kit! by Prem Reyel

Solid Value best in my review
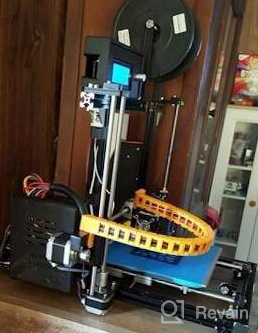
I purchased this printer in Feb 2016 and assembled at that time and have been using it since. This review is written Aug 2016, after assembly in March 2016, and a few months of use. I am an engineer who is new to 3D printing, but not electro-mechanical assembly. Here are my thoughts upon reflection:1) The assembly took me 2-3 multi-hour sessions, starting Friday night and finishing Sunday morning. It got a bit fiddly at times, but with patience it assembles well. As noted the instructions are not wordy, but are pictorially accurate, so look twice or thrice if something doesn't make sense. Sometimes the vantage point of a figure becomes rotated in the instructions between one step and the next, for clarity. I missed the rotation of the image (as the view was almost mirrored) and managed to perform one assembly step "backwards" which I then had to undo and rework. But I was in error, not the instructions. At one point I thought I was missing a part, and emailed the company. They responded within 48 hrs (over the weekend) but I since figured out my error and no resolution from the vendor was necessary. I really do not recall any issue I had with assembly or the final product that wasn't caused in some regard by me.2) I have found the auto-leveling feature to work fairly well, but it can't work miracles. I learned the bed needs to be halfway decently leveled. It's been my experience if the bed is too far off, the auto-level algorithm I am guessing, doesn't accommodate the larger corrections needed. So I have manually-leveled the bed twice since owning it (once at initial build, and a second times a few months later when I noticed a wing-nut had loosened).3) My printer shipped with a starter roll of white masking tape. Prints stuck "too well" to the white tape, necessitating that it be ripped up with the print itself. Switching to blue painters tape has worked well for me.4) I was able to print a test file successfully, on the first try I believe after assembly. I found a belt that was rubbing because I forgot a final inspection step after tightening things. Again, issue caused by me.5) In time, I read forums and FAQs, and ventured into adjusting print settings. I found some "calibration" files on Thingiverse and spent an afternoon dialing in various printer settings to optimize print quality. For me, adjusting head-speed and jerk settings downward from the printer and Cura defaults gained me the most in terms of quality. Having a set of calipers is nice if you're printing dimensioned items and want to check the accuracy. I found that once well adjusted, I was getting print tolerances that are in-line with the rest of the community on a range of different printers. The biggest dimensional errors seemed to be with inside holes. and I read a few places that is attributed to an error in Cura (or slicing software in general if I recall correctly). Outside dimensions and height stackups were pretty spot-on. I even started prototyping sheet-metal designs for my work, 3D printing from Inventor designs.6) The printer came with a starter spool of gold ("wood") PLA. After using most of that, I've been using Hatchbox PLA with good results.7) As time goes on, I realize there are some touches I'd like to have on the printer. Like an on/off switch. Others think alike, and there are numerous 3D files for a bracket that mount to the equipment and houses a standard on/off switch. So, many upgrades or updates may already exist in the community that you can just pick up and use. Again I would suggest this printer is for the DIY crowd. If not having an on/off switch is going to ruin your day, then let your wallet do the talking.8) Based on reading before purchasing this printer, I thought I would have issues with the "open air" (non enclosed) design. There is an A/C vent in the ceiling that blows more or less right on the printer, and I haven't found it to cause me any real problems that I can discern. Based on what I'd read some places, I thought an open-air printer could be barely manageable. but it's been a non-issue for me.Overall, I think this is a very good price-point of entry for someone who leans towards DIY and wants to try 3D printing without dropping over $1,000. I would parallel buying this 3D printer to buying a modest camera to get into photography. Learning to fully use what you have, and even to decide if you like the hobby, will teach you more and also allow you to figure out what you'd want in an upgraded piece of equipment.
- {}
- Assembly required: The kit comes with numerous parts that require assembly, which can be time-consuming and complicated for beginners new to 3D printing
New products
Comments (0)
Similar reviews

Top products in 🖨️ 3D Printers

UV Curing Standard Photopolymer Printer by IFUN
5 Review

High-Precision And Stable Creality Ender 3 V2 3D Printer With New UI, Silent Mainboard, Effortless Filament Feed-In, XY-Axis Tensioner, Resume Printing, And Large Build Volume Of 220×220×250Mm

11 Review

🔵 IFUN 3D Rapid Resin - Low Odor Photopolymer Resin for 405nm LCD 3D Printer - Fast Curing, Standard Rigid Formula - Sky Blue, 500g
5 Review

🖨️ IFUN 3D Printing Liquid Resin: High-Quality Innovative Solution
5 Review


